Showing posts with label quick tip. Show all posts

Thursday, May 23, 2013

Saw It, Pinned It, Did It!

I don't even know where to start with this one... so let's go straight in to it.

Yellow armpit stains.

Yup.

We all have been there...
(if you haven't, then I don't like you)
(kidding)

Wear a white t-shirt, wash it, then BAM... yellow stains.

WTF!?

This happens to ALL of my white shirts. Pizzes me off. So basically, I had this section of my closet that was white shirts that I could not wear because of these nasty stains. After it happened to one of my beloved Cigarette Racing tank tops, I had enough! One day on Pinterest, I found this:
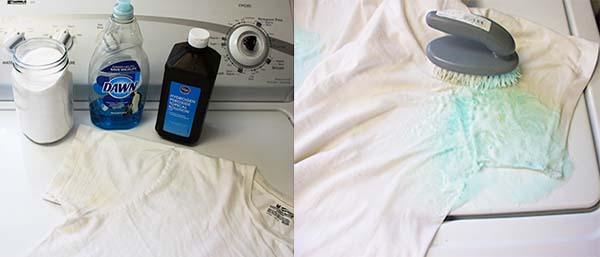
and this...
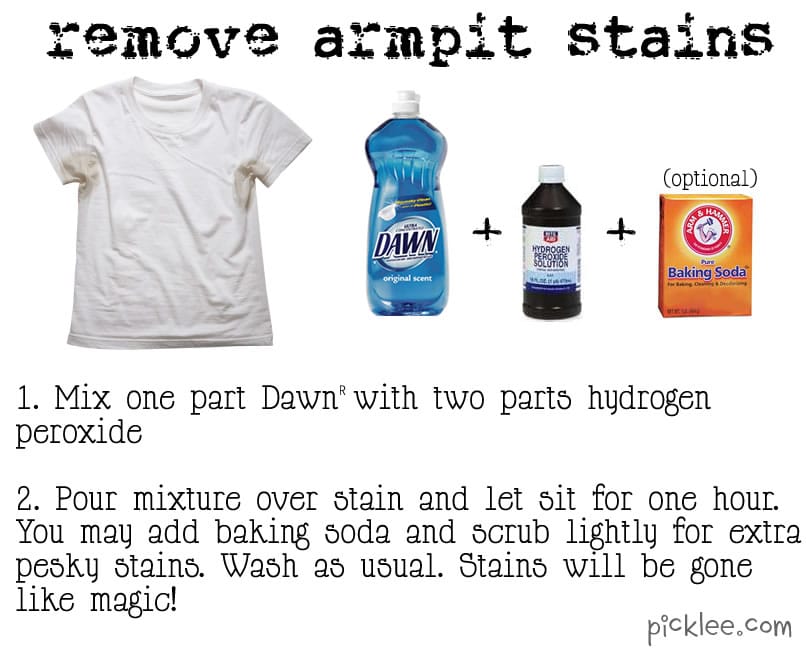
Hmmm.... I have all that stuff and it looks pretty easy. I pinned this almost one year ago and I finally took the time to sit down and treat my shirts yesterday.

I mixed my Dawn (Ajax works, too) and hydrogen peroxide in to a spray bottle for easier application. I sprayed it on the stains, sprinkled a little baking soda, sprayed a little more to make a paste, lightly scrubbed the spot to get the mixture deep in to the fabric, and then let it sit for a few hours. I washed the shirts in hot/cold soak cycle with detergent and Oxy Clean and when they came out they were CLEAN! I mean good as new!

I could not believe it!! I seriously did not think it would work, so my dumbass didn't take any before pictures. Horrible blogger, I know.

But trust me, It works. Some of these shirts have been sitting in my close since December of 2010. I kid you not. This stuff removed a stain that was two and a half years old. I still can't believe it!

Try it, I swear it works!

Happy Thursday!

Thursday, January 10, 2013

Saw It. Pinned It. Did It... Peel-N-Stick Cabinet Floors

Today I am linking up with Steph at BEAUtiful mess! Every Thursday her and Katie at Keep Calm & Carry On do a link-up for Pinterest projects!

Let's jump right in to this!

I saw this on Pinterest:


So I ran down to the local cheap flooring store and bought some vinyl tiles so I could do it, too!

Hello beautiful-under-sink-cabinet space!

Before:
ummmm yuck?
I know, right? Gross!
You can tell I place a high priority on this specific cabinet... NOT!
Considering my sweet hunny...
1. Painted the interior of the cabinets black... making for absolutely ZERO light reflection so you NEVER know what might jump out at you...
2. Is insanely obsessed with running wires through anything he can drill a hole in.
3. Is also obsessed with this yellow foamy crap called "Great Stuff".

This had to change... I am losing valuable cabinet space!

I got a box of 12 18" tiles for $15.00 at our local wholesale flooring store. I wanted solid white peel-n-stick but the lightest color they had was a light stone color.

I also bought a cabinet door shelf at Lowe's for $8.77.

How I did it...
Empty the cabinet
Vacuum-out all the disgusting foreign objects
Scrape the bottom of the cabinet in case anything has stuck to it that didn't vacuum up
Vacuum that crap up
Clean the entire cabinet with some sort of disinfectant
Test-fit your tiles
Cut to fit
Slap those babies in place

TA-DA!
Shiny new cabinet floors!
Easy to clean... brightens the cabinet... only takes 5 minutes!!


Friday, January 4, 2013

"Last Wash" Tutorial

I have a slight obsession with doing laundry. Like... big time. I will wash everything in sight if I'm in the right mood. That mood is just about every other day. Nobody needs to wash their curtains three times a week, yo! So I created a little dry-erase board to keep track of the last time I washed certain items.

It's so easy. You only need a few items.

Duck tape... preferably the new, hip, printed kind
Scissors
Two "Medium" 3M hanging strips
Dry Erase Marker
Two report covers like this:
(clear, thick plastic... also used for projectors... like back in high school note taking days)

Let's get started!

I chose the five things that I find myself always wondering
"When was the last time I washed this?"

Bed Sheets
Pillow Cases
Bathroom Rugs
Cat Food Mats
Throw Blankets

and then I typed up a pretty little Word Document with some dot leaders...

I put that aside, then taped together two pieces of plastic. Leave one side open so you can slide your paper in and out.
Take your time on this!

Then I slid my print-out between the two pieces.
Next we are going to put the 3M strips on the back...
And then slap that baby on the wall!
Now is the fun part... write the date that you washed each item.
I put mine right beside the washing machine.
Works great! I am already using it!!

I considered using a picture frame, but I didn't want to risk it falling off the wall or the washing machine lid hitting it when it's open. If you have more room, a picture frame would look cute!

This is just another way for you to clear your mind of something you can write down really quick. We travel so much and are always on the run so I can never remember when I wash that stuff. Now I will always know!

Have a great weekend!

Thursday, July 19, 2012

DIY: How To Blow the Door Off Your Microwave

Seriously.

Well... I didn't really blow the door off my microwave, but I blasted that bad boy wide open in mid-cook.

I decided yesterday I was going to do some deep cleaning... organize the garage, clean the oven, and clean the microwave.

I had the organizing part down pat but I needed some help with the oven and microwave.

First the oven:
Mix baking soda and water in to a paste and slather it on the oven glass. Leave for 20 minutes. Wipe clean.
Easy peasy.

Next, the microwave:
Mix one cup vinegar and one cup water in glass measuring dish and place in microwave for 10 minutes.
Easy again, right?
No.
no, no, no

Our microwave is very powerful. It's like the Maserati of microwaves. Knowing this, I only put my concoction in for five minutes.

After five minutes, I busted out my wet rag and started wiping.
Nothing happened.
K... I didn't leave it in long enough.
No prob.
Another five minutes should do.

So I press start and head upstairs to use the facilities.
Then I hear...

kaPOW!!!!!!!!!!

WHAT THE FLUCK WAS THAT!?

I run downstairs and the microwave door is wide open and it the smell of vinegar has infiltrated the entire room.

So here's the scene...
(Microwave is above the stove)
Oven door is wide open with my baking soda concoction doing it's magic...
All of my glass and metal baking dishes are sitting on top of the stove...
Microwave door is wide open...
Measuring cup in the microwave has about a half-cup of liquid inside...
And there is vinegar water EVERYWHERE!
In my dishes, pans, on the stove, in the oven, on the counter tops, on the floor... hell it was probably on the ceiling and I just forgot to look.

I call Tyson and say:
"Hey, I just blew the door off the microwave."

He hung up on me and was in the kitchen in about 5 seconds.
Oh and he was in a meeting so he brought Matt, our tool guy in to see the destruction.

Let's just say he was relieved to see the door was still attached to the microwave.

So here I am thinking...
"Only me. Only I can blow the door off a microwave."

nope.

This happens to other people, too.

Then Matt tells me...
"My friend's fiance put a package of meat wrapped in aluminum foil in the microwave and blew a hole in it the size of a grapefruit."
BAHAHA!
Wish I could have seen that!

So beware... what looks so easy basically turned in to a bigger mess than I had before.
Oh and the crap in the microwave didn't come off.
But the oven glass cleaning concoction did work pretty well. I give it an 8.

Happy Thursday, Lovelies.

Friday, June 8, 2012

Quick Tip... Ironing Shorts

Quick Tip!

How to iron your shorts with your hair straightener.


Cuffing your shorts is very popular right now. I like buying shorts with a longer inseam and cuffing them to my preference. Being 5' 10", it's hard to find shorts that are the right length.

So, like with these American Eagle Midi Shorts, when you buy them in the store, they are perfectly cuffed. When you take them home and wash them, there are no stitches holding the cuff in place. This is a good thing and a bad thing. Good because you can adjust the cuff to your desired length. Bad because you have to iron the cuff so they stay in place all day.

If you are anything like me, whipping out the iron just for a pair of shorts isn't my style. I use a much quicker, easier method.

My hair straightener.

Yep. Plug that bad boy in and turn it up to the MAX! I usually wait until after I have used it on my hair. It's already on and hot, it just needs to be cranked up. I turn mine to 450 degrees.


First, I put my shorts on and cuff them to my desired length. I look in the mirror and make sure my cuffs are even on both sides and then take them off to iron them.


(Please don't try to iron your shorts while you are wearing them. You will burn yourself. Trust me. I have done it.)

Finally, flat iron that cuff in place! Don't hold it on for too long. You will have a nice crease, that will do.


So that's my quick tip! It works great on other items of clothing, too. Ribbons, sashes, etc...

Have a great weekend!